ffmpeg -i cinta.ts -map 0 -c copy cinta.mp4Hasil dapat mengubah kecepatan dengan Windows Media Player
ffmpeg -i cinta.ts cinta2.mp4Hasil tidak dapat mengubah kecepatan dengan Windows Media Player.
 |
| cinta.ts cinta.mp4 cinta2.mp4 |
MKV TO MP4
Ini hanya mengubah MKV to MP4, menghemat kinerja CPU.
It's very straight forward using
ffmpeg:ffmpeg -i LostInTranslation.mkv -codec copy LostInTranslation.mp4ffmpeg -i LostInTranslation.mkv -vcodec copy -acodec copy LostInTranslation.mp4
Kedua perintah ini sama, menyalin codec video and audio, sehingga tidak ada yang di-kodekan. Hasil tidak dapat mengubah kecepatan dengan Windows Media player.

Convert ulang
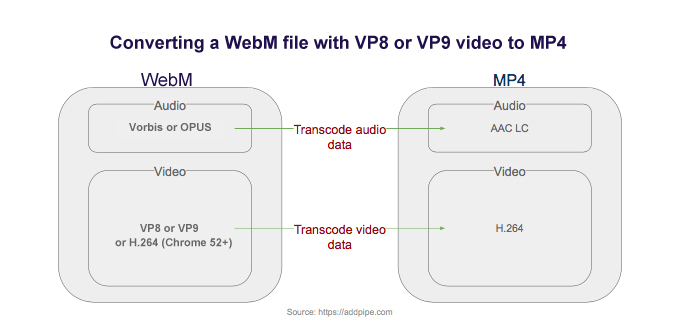
When the WebM file contains VP8 or VP9 video, you have no choice but to transcode both the video and audio..
Video conversion can be a lengthy and CPU intensive process, depending on file size, video and audio quality, video resolution, etc. but FFmpeg provides a series of presets and controls to help you optimize for quality or faster conversions.
A note on video quality
When encoding video with H.264, the video quality can be controlled using a quantizer scale (crf value, crf stands for Constant Rate Factor) which can take values from 0 to 51: 0 being lossless, 23 the default and 51 the worst possible. So the lower the value the better the quality. You can leave the default value or, for a smaller bitrate, you can raise the value:
ffmpeg -i video.webm -crf 26 video.mp4
Video presets
FFmpeg also provides several quality presets which are calibrated for a certain encoding speed to compression ratio. A slower preset will provide a better compression. The following presets are available in descending order: ultrafast, superfast, veryfast, faster,
fast, medium, slow, slower and veryslow. The default preset is medium but you can choose a faster preset:ffmpeg -i video.webm -preset veryfast video.mp4
Placing the MOOV atom at the beginning
All MP4 files contain a
moov atom. The moov atom contains information about the length of the video. If it’s at the beginning it immediately enables a streaming video player to play and scrub the MP4 file. By default FFmpeg places the moov atom at the end of the MP4 file but it can place the mov atom at the beginning with the -movflags faststart option like this:ffmpeg -i video.webm -movflags faststart video.mp4
Using Levels and Profiles when encoding H.264 video with FFmpeg
To ensure the highest compatibility with older iOS or Android devices you will need to use certain encoding profiles and levels. For example a video encoded with the High Profile and Level 4.2 will work on iPhone 5S and newer but not on older iOS devices.
ffmpeg -i video.webm -movflags faststart -profile:v high -level 4.2 video.mp4Converting WebM with H.264 video to MP4
In some rare cases the .webm file will contain H.264 video and Vorbis or Opus audio(for example .webm files created using the MediaRecorder API on Chrome 52+ ). In such cases you don’t have to re-encode the video data since it’s already in the desired H.264 format (re-encoding is also not recommended since you’ll be loosing some quality in the process while consuming CPU cycles) so we’re just going to copy over the data

To copy the video data and transcode the audio in FFmpeg you use the
-c:v copy option:ffmpeg -i video.webm -c:v copy video.mp4