About sfc


Sfc or sfc.exe stands for System File Checker. It’s a utility in Microsoft Windows operating systems, starting from Windows 98, that allows you to scan and restore corruptions in system files.
The sfc utility is available for Windows XP, Windows Vista, Windows 7, Windows 8, Windows 8.1 and Windows 10.
To run this utility you need to be logged in as an Administrator.
Parameters
The most command parameter for this utility is:
sfc /scannow
The /scannow command will scan for issues and, if it finds one, it will attempt to replace the files that have issues from the DLL Cache.
In Windows Vista or later (7, 8, 8.1), the sfc utility can be used to scan individual files.
Other parameters for the sfc utility are:
sfc /scanonce will scan the system files only once.
sfc /scanboot will scan the system files at every boot of your computer
sfc /revert will return the scan to its default operating
sfc /purgecache will remove the Windows File Protection cache and begin a scan over the system files
sfc /cachesize=x, where x is the size in MB, will set the cache size of the Windows File Protection
sfc /? will display the help list
Run sfc in Windows 7
To run the sfc in Windows Vista, follow these steps:

1. Click Start
2. Type command prompt in search box
4. Click Run as administrator
5. Click Continue or Yes on the UAC warning window to allow this action
6. When Command Prompt appears, type the command:
sfc /scannow
7. Press Enter
You can also run the sfc command via the installation disc or the System Recovery Options panel installed on your computer.
Method #1
1. Insert the original Windows 7 installation DVD in the disc tray and reboot your computer
2. Press any key when it says “Press any key to boot from CD or DVD..”
3. Select a language and keyboard option
4. Click Repair your computer


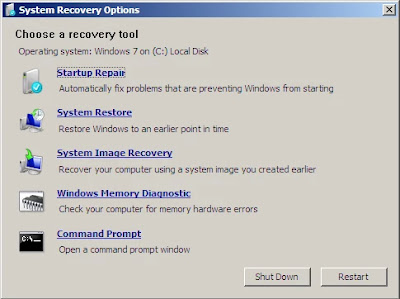
6. Choose Command Prompt
7. Type the command and press Enter:
sfc /scannow /offbootdir=c:\ /offwindir=c:\windows
Replace c: with the letter of the drive where Windows 7 is installed.
Method #2
1. Restart your computer
2. Press the F8 key several times during booting before the Windows 7 logo appears
3. At the Advanced Options screen, select Repair your computer


If Repair your computer option isn’t available, follow Method #1 above.
4. Select a keyboard and language
5. Type the command and press Enter:
sfc /scannow /offbootdir=c:\ /offwindir=c:\windows
Replace c: with the letter of the drive where Windows 7 is installed.
Troubleshooting
sfc isn’t recognized
If the sfc commands you’re typing in Command Prompt aren’t being recognized, make sure that:
· You’re logged in as an Administrator
· Or you’re logged in as a user of an Administrator group
Windows Resource Protection could not perform
You may receive this error while trying to perform a /sfc scannow:
Windows Resource Protection could not perform the requested operation
This error usually appears if the hard disk has corruptions or bad sectors. To fix this error, you can try any of the following tips:
Tip #1: Boot into Safe Mode
Try to run the sfc /scannow command while in Safe Mode. To boot into Safe Mode, follow these steps:
1. Boot your computer
2. Press the F8 key before the Windows logo appears
3. At the Windows Options screen, use the arrows keys and select Safe Mode
4. Press Enter
To get the full instructions on how to boot into Safe Mode, read our guide on Safe Mode with instructions for each Windows version:
Tip #2: Run chkdsk
If Tip #1 doesn’t work, also try to run chkdsk commands to check if your hard disk has bad sector or corruption issues.
To run chkdsk (related guide: chkdsk), follow these steps:
1. Insert the original Windows installation CD or DVD
2. Go to Command Prompt. Depending on your Windows version, Command Prompt is:
§ Windows XP: Go to Recovery Console
§ Windows Vista or 7: Go to System Recovery Options
§ Windows 8 or 8.1: Go to Troubleshoot > Advanced Options
3. When Command Prompt appears, type this command:
chkdsk c: /r
Where c: is where your Windows is installed.
Press Enter
Windows Resource Protection could not start the repair service
The sfc utility may return the following error when you try to run it:
Windows Resource Protection could not start the repair service
If it returns this error, run the following commands:
1. ren c:\windows\winsxs\pending.xml pending.old
Replace C with the drive’s letter where Windows is installed on.
2. sfc /scannow /offbootdir=[c]:\ /offwindir=[c]:\windows
Replace C with the drive’s letter where Windows is installed on.
More Information
Support Links
· Easy Recovery Essentials for Windows – our repair and recovery disk.
It’s an easy-to-use and automated diagnostics disk. It’s available for Windows 8, Windows 7 and Windows Vista. It’s also available for Windows XP and Windows Server.
It’s an easy-to-use and automated diagnostics disk. It’s available for Windows 8, Windows 7 and Windows Vista. It’s also available for Windows XP and Windows Server.
Read more at Windows Recovery Disks.
· The NeoSmart Support Forums, member-to-member technical support and troubleshooting.
· Get a discounted price on replacement setup and installation discs: Windows XP, Windows Vista, Windows 7, Windows 8, Windows 10.
Applicable Systems
This Windows-related knowledgebase article applies to the following operating systems:
· Windows XP (all editions)
· Windows Vista (all editions)
· Windows 7 (all editions)
· Windows 8 (all editions)
· Windows 8.1 (all editions)
· Windows 10 (all editions)
Use the System File Checker tool to repair missing or corrupted system files
If some Windows functions aren't working or Windows crashes, use the System File Checker to scan Windows and restore your files.
Though the steps below might look complicated at first glance, just follow them in order, step-by-step, and we’ll try to get you back on track.
Run the System File Checker tool (SFC.exe)
To do this, follow these steps:
1. Open an elevated command prompt. To do this, do the following as your appropriate:
Windows 8.1 or Windows 8
Windows 10, Windows 7, or Windows Vista
2. If you are running Windows 10, Windows 8.1 or Windows 8, first run the inbox Deployment Image Servicing and Management (DISM) tool prior to running the System File Checker. (If you are running Windows 7 or Windows Vista, skip to Step 3.)
Type the following command, and then press Enter. It may take several minutes for the command operation to be completed.
DISM.exe /Online /Cleanup-image /Restorehealth
Important: When you run this command, DISM uses Windows Update to provide the files that are required to fix corruptions. However, if your Windows Update client is already broken, use a running Windows installation as the repair source, or use a Windows side-by-side folder from a network share or from a removable media, such as the Windows DVD, as the source of the files. To do this, run the following command instead:
DISM.exe /Online /Cleanup-Image /RestoreHealth /Source:C:\RepairSource\Windows /LimitAccess
Note: Replace the C:\RepairSource\Windows placeholder with the location of your repair source. For more information about using the DISM tool to repair Windows, reference Repair a Windows Image.
3. At the command prompt, type the following command, and then press ENTER:
sfc /scannow


The sfc /scannow command will scan all protected system files, and replace corrupted files with a cached copy that is located in a compressed folder at %WinDir%\System32\dllcache.
The %WinDir% placeholder represents the Windows operating system folder. For example, C:\Windows.
Note Do not close this Command Prompt window until the verification is 100% complete. The scan results will be shown after this process is finished.
4. After the process is finished, you may receive one of the following messages:
· Windows Resource Protection did not find any integrity violations.
This means that you do not have any missing or corrupted system files.
· Windows Resource Protection could not perform the requested operation.
To resolve this problem, perform the System File Checker scan in safe mode, and make sure that the PendingDeletes and PendingRenames folders exist under %WinDir%\WinSxS\Temp.
· Windows Resource Protection found corrupt files and successfully repaired them. Details are included in the CBS.Log %WinDir%\Logs\CBS\CBS.log.
To view the detail information about the system file scan and restoration, go to How to view details of the System File Checker process.
· Windows Resource Protection found corrupt files but was unable to fix some of them. Details are included in the CBS.Log %WinDir%\Logs\CBS\CBS.log.
To repair the corrupted files manually, view details of the System File Checker process to find the corrupted file, and then manually replace the corrupted file with a known good copy of the file.
More Information
How to view details of the System File Checker process
To view the details that included in the CBS.Log file, you can copy the information to the Sfcdetails.txt file by using the Findstr command, and then view the details in the Sfcdetails.txt. To do this, follow these steps:
1. Open an elevated command prompt as described in the previous step 1.
2. At the command prompt, type the following command, and then press ENTER:
findstr /c:"[SR]" %windir%\Logs\CBS\CBS.log >"%userprofile%\Desktop\sfcdetails.txt"
Note The Sfcdetails.txt file contains details from every time that the System File Checker tool has been run on the computer. The file includes information about files that were not repaired by the System File Checker tool. Verify the date and time entries to determine the problem files that were found the last time that you ran the System File Checker tool.
3. Open the Sfcdetails.txt file from your desktop.
4. The Sfcdetails.txt file uses the following format:
Date/Time SFC detail
The following sample log file contains an entry for a file that could not be repaired:
2007-01-12 12:10:42, Info CSI 00000008 [SR] Cannot
repair member file [l:34{17}]"Accessibility.dll" of Accessibility, Version =
6.0.6000.16386, pA = PROCESSOR_ARCHITECTURE_MSIL (8), Culture neutral,
VersionScope neutral, PublicKeyToken = {l:8 b:b03f5f7f11d50a3a}, Type
neutral, TypeName neutral, PublicKey neutral in the store, file is missing
How to manually replace a corrupted system file with a known good copy of the file
After you determine which system file was corrupted and could not be repaired through the detail information in the Sfcdetails.txt file, find where the corrupted file located, and then manually replace the corrupted file with a known good copy of the file. To do this, follow these steps:
Note You may be able to get a known good copy of the system file from another computer that is running the same version of Windows with your computer. You may perform a System File Checker process on that computer to make sure the system file that you intend to copy is a good copy.
1. Take administrative ownership of the corrupted system file. To do this, at an elevated command prompt, copy and then paste (or type) the following command, and then press ENTER:
takeown /f Path_And_File_Name
Note The Path_And_File_Name placeholder represents the path and the file name of the corrupted file. For example, type takeown /f C:\windows\system32\jscript.dll.


icacls Path_And_File_Name /GRANT ADMINISTRATORS:F
Note The Path_And_File_Name placeholder represents the path and the file name of the corrupted file. For example, type icacls C:\windows\system32\jscript.dll /grant administrators:F.

3. Replace the corrupted system file with a known good copy of the file. To do this, copy and paste (or type) the following command, and then press ENTER:
Copy Source_File Destination
Note The Source_File placeholder represents the path and file name of the known good copy of the file on your computer, and the Destination placeholder represents the path and file name of the corrupted file. For example, type copy E:\temp\jscript.dll C:\windows\system32\jscript.dll.
If the steps above don't work, you may need to reinstall Windows. For more info, see Windows 10 recovery options.
source: scf.pdf